Redshift
This data destination connector sends data to a Redshift database. It can either write data to an existing Redshift database, or to a new database it provisions to you. The latter case is useful for sharing your data in form of an SQL database with some service. For example, you can use it to send data to Tableau or PowerBI.
Configuration
Section titled “Configuration”Create a new configuration of the Redshift data destination connector.
The first step is to Set Up Credentials:
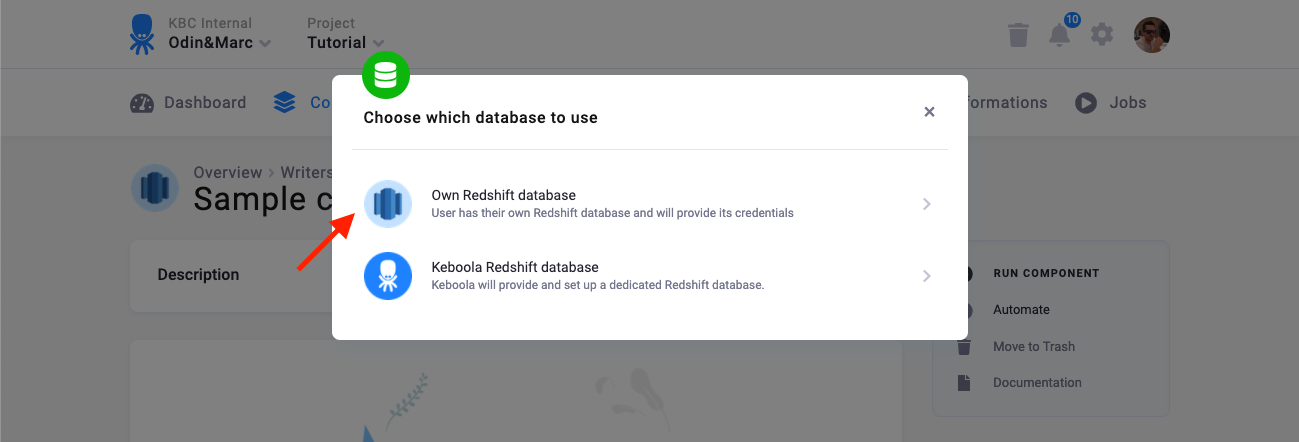
There are two modes of operation of the connector:
- Own Redshift database --- Use this when you have your own Redshift database — i.e., you have your own Redshift cluster, or someone gave you credentials of a database to write to.
- Keboola Redshift database --- In this mode, the connector will create a new database for you and give you credentials to it.
Own Redshift Database
Section titled “Own Redshift Database”You need to provide a host name, user name, password, database name, and schema.
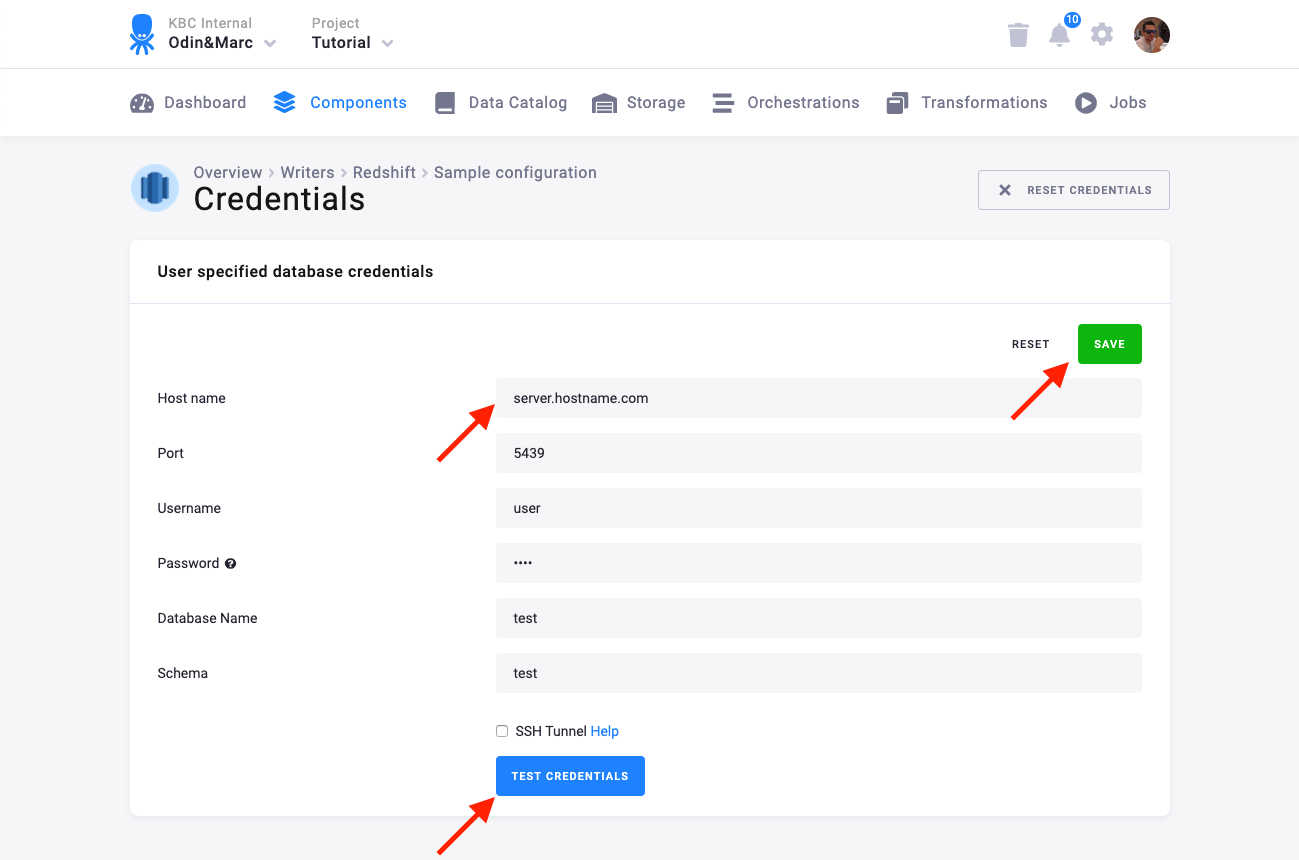
We highly recommend that you create dedicated credentials for the connector in your Redshift database. You can use the following SQL code to get started:
CREATE GROUP writer_sample;CREATE SCHEMA writer_sample;GRANT ALL ON SCHEMA writer_sample TO GROUP writer_sample;CREATE USER writer_sample WITH PASSWORD 'Writer_sample1';ALTER SCHEMA writer_sample OWNER TO writer_sample;ALTER USER writer_sample SET search_path TO writer_sample;ALTER GROUP writer_sample ADD USER writer_sample;It is also possible to secure the connection using an SSH tunnel.
Keboola Redshift Database
Section titled “Keboola Redshift Database”A Keboola Redshift database is created by the connector and the credentials are provisioned for you:
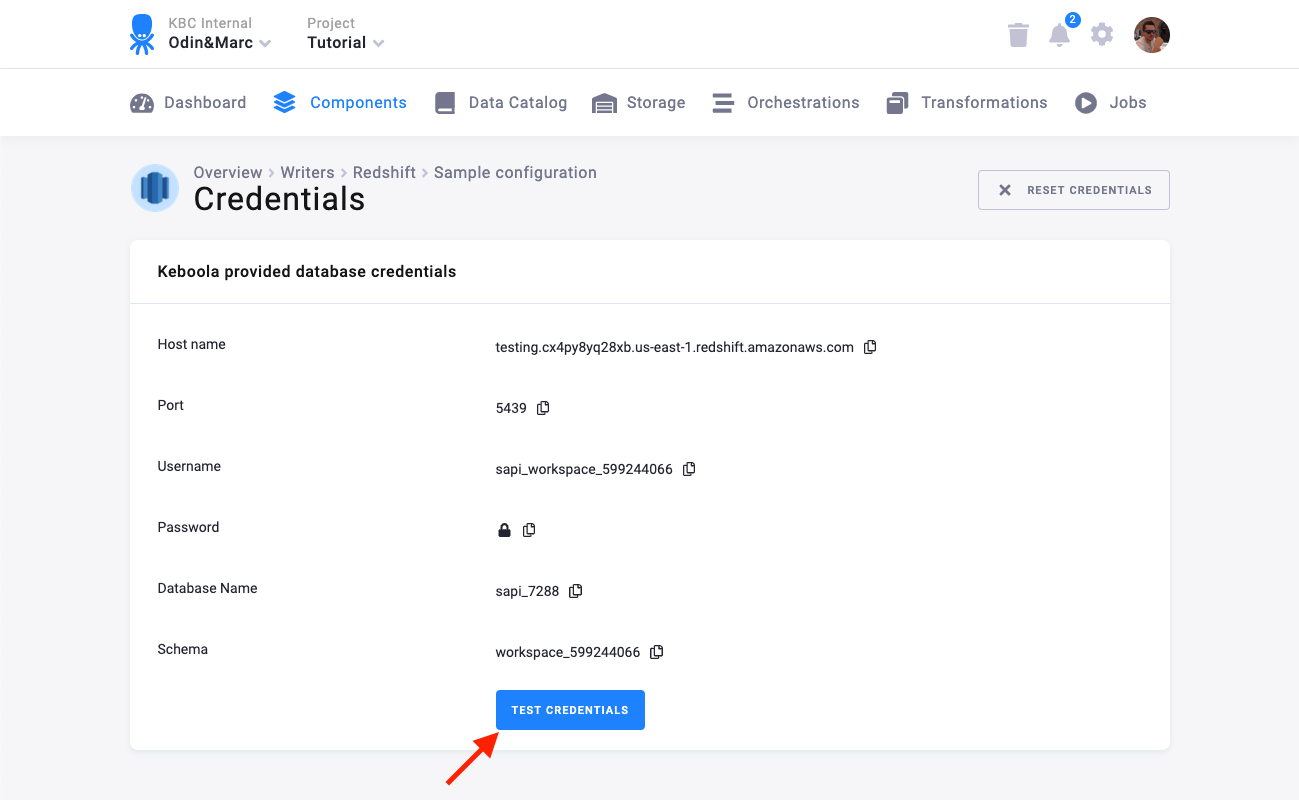
You can share the credentials with services that need to access your data --- for example, with Tableau Online. Note that the database is provided solely for the purpose of sharing your existing data with the outside world. This means that it must not be receiving any data (outside those provided by the connector itself, of course). This is a contractual limitation. Also note that the number of provisioned Redshift databases is part of project limits.
Note: This feature is available only for projects with the Redshift Storage backend. If you need a provisioned database in non-Redshift projects, use the Snowflake data destination connector for the purpose.
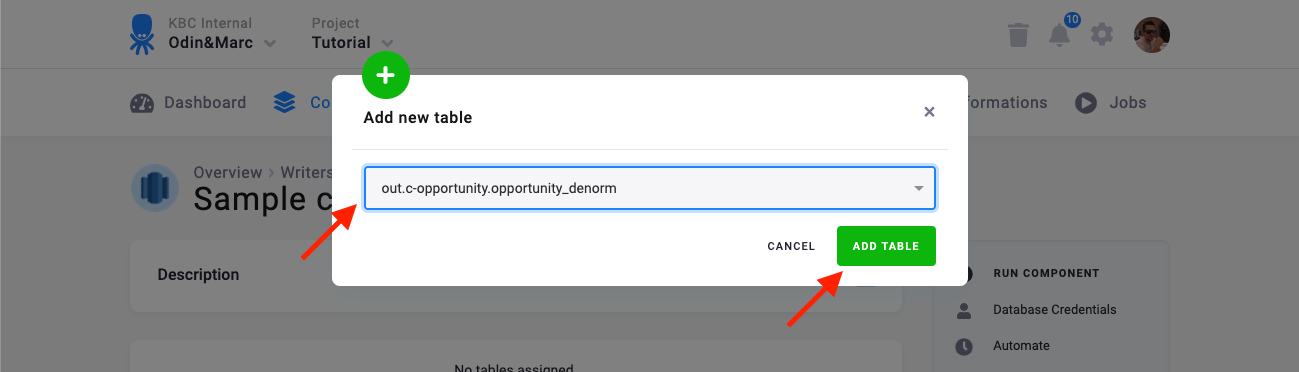
Table Configuration
Section titled “Table Configuration”The next step is to configure the tables you want to write. Click Add New Table and select an existing table from Storage:
The next step is to specify table configuration. Use the preview icon to peek at the column contents.
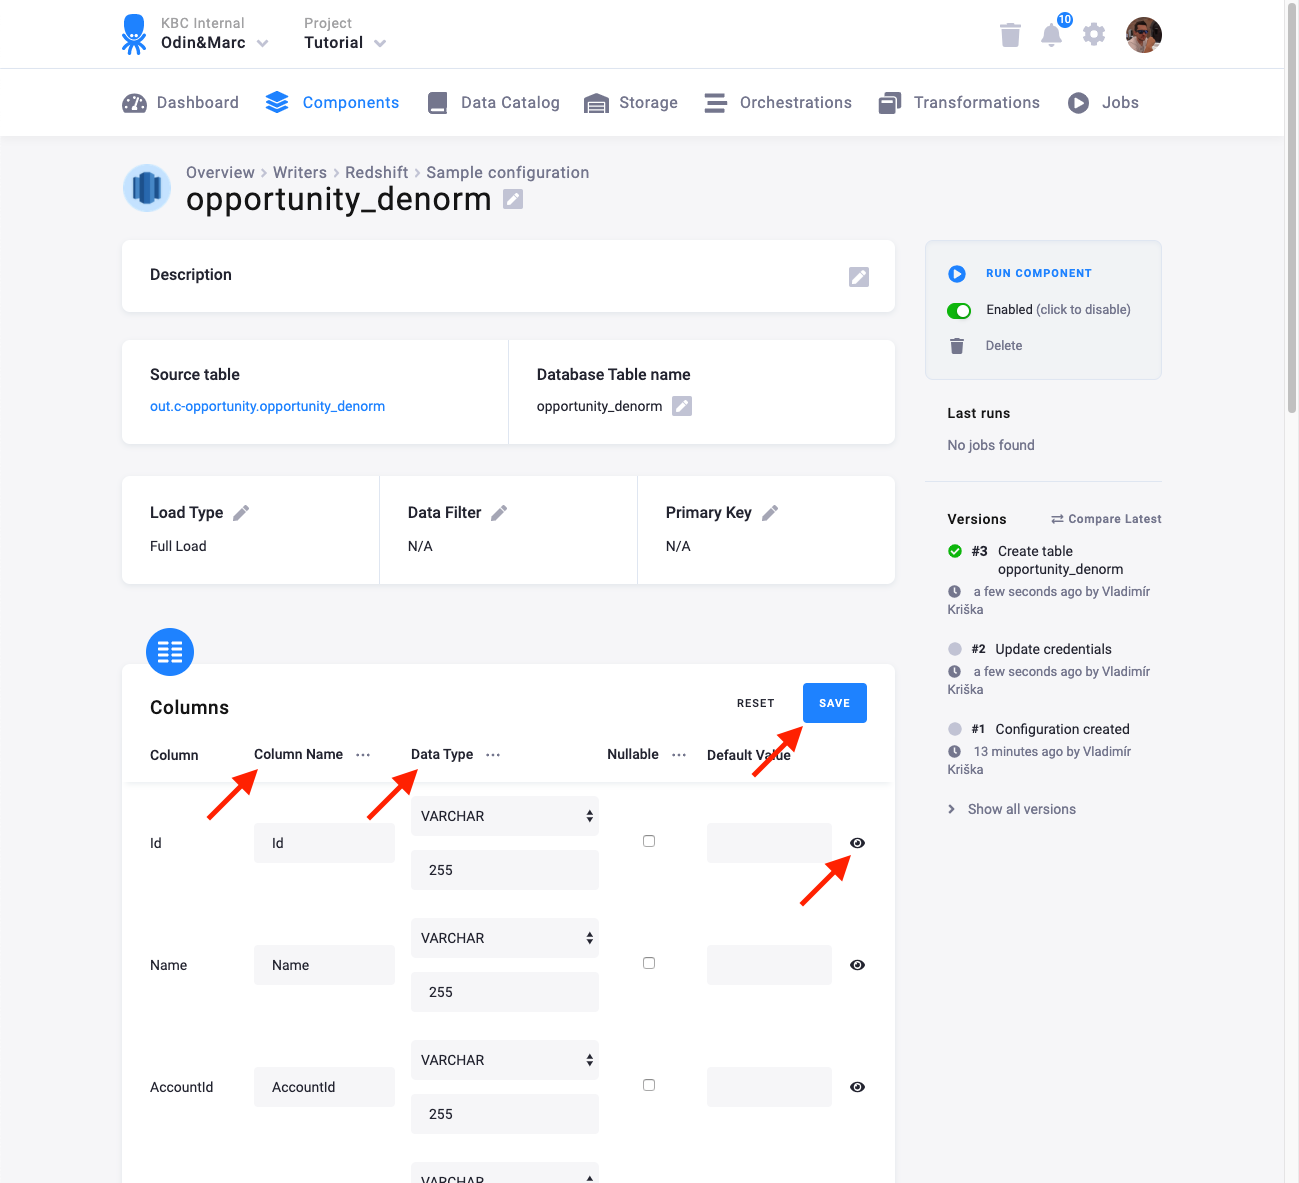
For each column you can specify its
- name in the destination database; you can also use the select box in the table header to bulk convert the case of all names.
- data type (one of Redshift data types); you can also use the select box in the table header to bulk set the type for all columns. Setting the data type to
IGNOREmeans that column will not be present in the destination table. - nullable; when checked, the table column will be marked as nullable. During import, values containing the string
NULLwill be converted to an actualNULL. - default value; the provided value will be set as the default value of the column in target table.
When done configuring the columns, don’t forget to Save the settings.
Load Options
Section titled “Load Options”At the top of the page, you can specify the target table name and additional load options. There are two main options how the connector can write data to tables --- Full Load and Incremental Load.
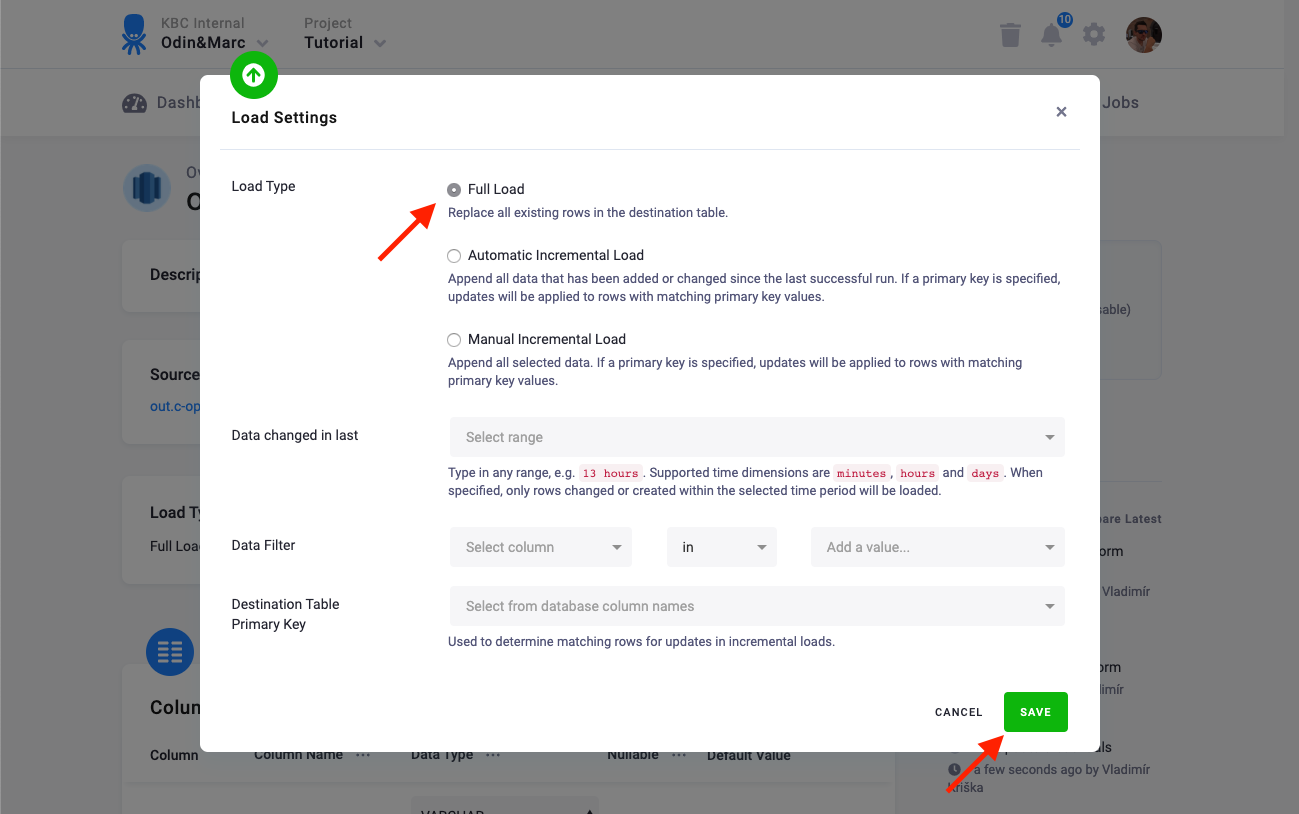
In the Incremental Load, the data are bulk inserted into the destination table and the table structure must match (including the data types). That means the structure of the target table will not be modified. If the target table doesn’t exist, it will be created. If a primary key is defined on the table, the data is upserted. If no primary key is defined, the data is inserted.
In the Full Load mode, the table is completely overwritten including the table structure. The table is removed
using the DROP command and recreated. The
DROP command needs to acquire a table-level lock.
This means that if the database is used by other applications which acquire table-level locks, the connector may
freeze waiting for the locks to be released. See the Redshift docs
for more details.
Additionally, you can specify a Primary key of the table, a simple column Data filter, and a filter for incremental processing.
Using Keboola Provisioned Database
Section titled “Using Keboola Provisioned Database”The connector offers the option to create a Keboola Provisioned database for you. You can use this database to connect Keboola to a wide range of consumers --- especially Business Intelligence tools and Analytics. The database can be queried in real time but is still completely isolated from your project Storage.
Connect to Looker
Section titled “Connect to Looker”It is possible to use the Redshift connector to share data with Looker. To share data between your Keboola project and PowerBI, choose Keboola Redshift Database when configuring the credentials. The connector will create a dedicated database for you and give you credentials. Run the connector and when it is finished, you can connect the Looker data sources. Follow the official instructions. Note that you can skip a number of steps because a dedicated user is already created for you.
Connect to Power BI Desktop
Section titled “Connect to Power BI Desktop”It is possible to use the Redshift connector to share data with Power BI Desktop or Tableau Online. To share data between your Keboola project and PowerBI, choose Keboola Redshift Database when configuring the credentials. The connector will create a dedicated database for you and give you credentials. Run the connector and when it is finished, you can connect the Power BI data sources. Follow the official instructions for Power BI Desktop.
Connect to Qlik
Section titled “Connect to Qlik”It is possible to use the Redshift connector to share data with Qlik Sense and QlikView. To share data between your Keboola project and PowerBI, choose Keboola Redshift Database when configuring the credentials. The connector will create a dedicated database for you and give you credentials. Run the connector and when it is finished, you can connect the Qlik data sources. Follow the Qlik official integration guide.
Connect to Tableau
Section titled “Connect to Tableau”It is possible to use the Redshift connector to share data with Tableau Desktop or Tableau Online. This is usually more efficient and faster than loading data through TDE files with the TDE data destination connector.
To share data between your Keboola project and Tableau, choose Keboola Redshift Database when configuring the credentials. The data destination connector will create a dedicated database for you and give you credentials. Run the connector and when it is finished, you can connect the Tableau data sources. Follow the official instructions for Tableau Desktop or for Tableau Online.